Saturday, December 25, 2010

"A Snowman's Best Friend"

Merry Christmas to all! Here is another little snowman carving I finally finished. I had the idea to do one with a "snow-dog" but never found time to complete it. These little guys are pretty popular with customers .....and daughters! This one was claimed before the glue dried.

Sunday, December 19, 2010

"Marine Cane"

This was a last minute order for a Christmas present that I finally completed after the third attempt. I need to try and remember that I don't have a lot of success carving detailed work into end grain! The carving looked great until I applied a finish and then it looked awful. I tried some things to fix it and again it looked great until I applied a finish. It was just too dark. So I decided to do a little scrimshaw work on some palm ivory (tagua nut), which seemed appropriate for a Marine. I've had several people suggest that I try adding contrasting spacers to my canes, so this is somewhat of an attempt to try that! I like the way it turned out, finally! The handle is walnut and the shaft is Bradford pear with the bark on. Thanks for looking and comments and advice or critiques are always appreciated!


Wednesday, December 15, 2010

"Old and Improved!"

 I like to revisit "old" carvings that I have previously finished or ideas that I have did before and see if I have improved. Sometimes I will even recarve portions of work that I never really completed. I often wonder if I subconciously don't finish some things because I am not happy with a certain area and it will just have to wait until I can be happy with it? I enjoy the process of carving, of creating, of making something out of nothing, out of such simple materials. And I enjoy being able to improve my work, in training my hands to create what my mind imagines. And in training my mind to imagine, to challenge my skills, to go in directions that are new for me. This month will end the second year that I have been carving and I like to compare what I can do now to what I did when I started. My first carving was a wood spirit from a piece of white oak out of my stack of firewood ....if nothing else, I have learned to choose easier wood to carve by hand! This is is a similar piece out of cottonwood bark. I think this one has more of a realistic look, not so sad or stern
, more of a Santa than a wood spirit.

 
I am finishing a cane for a retired marine and then I plan to revisit one of my "twisted" Santa ornaments as a Christmas gift for someone special. This is a busy time of year for Santa carvers! Thanks for looking.


Thursday, November 18, 2010

"Family Tree Cane"

 
Here is a cane I completed as a commission for a customer in Tennesee. Hidden within the leaves are the names of each family member. The handle is walnut and the shaft is crape myrtle. The leaves and limbs are relief carved and textured with a pyrographic pen. I have always had problems photgraphing canes, so I made a short video panning up and down the shaft. Here's a link to the video... take a look and let me know if you think it is a good way to present a carving. Thanks for looking!


Thursday, November 11, 2010

More Moving Pictures!


OK! I figured out how to upload my videos to YouTube and embed the links to them! This video is actually part of a series of blogs I am doing on cane design and carving at Lumberjocks.com. You can check out the series here http://lumberjocks.com/mpounders/blog . Thanks for looking!

Tuesday, November 9, 2010

Moving Pictures

One of the problems I have sometimes struggled with is the process of taking just the right photograph to show my work. It is critical in today's networked world to be able to communicate in ways that use to take place in direct contacts with your customers. A lot of contests I have entered are judged strictly on the photographs of the carvings, rather than the carving itself. And items sold online have to be browsed strictly by providing the appropriate number of good quality photographs. It is always a struggle to photgraph canes and staffs, primarily because of the length and because the carvings are wrapped around the cylinder of the shaft. I have seen some photgraphy and some cameras have the ability to stitch separate pictures to give a wide panoramic view. I don't have a camera that will do that, but I do have one that will do movies! So I am experimenting with that! I have admired some three dimensional drawings on the Wood Carving Illustrated web site that let you rotate and view the carving from all angles, so I hope these will be useful. Stand by for some more attempts at this, if I can get it posted in the correct formats!

Let me know if this is a good idea!

Wednesday, October 27, 2010

"Hitty-ous Doll?"

My daughter thought that was funny when she came up with it! So I will not post a picture of my second doll, since it is not quite as attractive as the first! I have been researching these dolls and have compiled a collections of dolls that I think are exceptional in appearance and will use those as further ideals to strive for. I was told that it is difficult to recall all the lessons you learn, but that repetition will help. I believe I was told that if I carved about 200 faces/dolls that I would get really good at it. Only about 190 to go!

Smaller faces are easier to mess up than larger ones..... a fraction of an inch is not noticable on a carving several feet tall......very noticable on a face that is 1 inch tall. I plan to cut out multiple blanks for my next attempts, hoping that working on four at a time will produce at least one or two good ones. I'm considering carving multiples of the limbs also, so that I will be able to pick and choose and do final assemblies with the best of my attempts.

I have cut out some additional twisted crosses that I will work on in spare moments. People seem to like them but something interesting seems to occur quite often.... as much as people like them, they always seem to find someone that they want to give them to! It's seems to encourage people to share and give... sometimes in moving ways.

I am just relaxing a bit with some whittling with the box-cutter. After working feverishly on a major carving, I always enjoy just carving something for fun... for the peace it brings. I really enjoy sometimes just starting with a piece of wood and seeing where it takes me, without the restrictions of a design or an idea. This one was with a Lynn Doughty-style head blank, but it may turn into a David Sabol-influenced cane topper. Or it may be excellent kindling! We shall see.....

Friday, October 22, 2010

Balanced Santa Staff

 I had a request to create a staff but it needed to be 60" tall and they wanted a Santa and two elves on it. So I thought about it for a while and came up with this design. I wanted something that looked like a scene instead of a bunch of items just kinda mashed together. The idea of Santa being balanced on a stack of presents kinda led to the whole theme. I decided to use stacked elements with a metal rod epoxied down the middle to allow me to get the positioning and look exactly like I wanted it. The Santa is 6" tall and the entire carved section is about 22" long. The Santa and elves are out of basswood and the rest of the carvings and staff are poplar. I used acrylics and metallic paints on the carved portion. The staff was first stained with Rit clothing dye. After sealing it with laquer I applied red oil paint as a highlighting stain to give it more depth. Comments and advice are always welcomed! Thanks for looking!


Tuesday, October 12, 2010

Twisted Crosses

 I've been pretty busy with carving and work since my last post. I modified my carving vise and mounted it on a post attached to an old cast iron base that went to a retired patio umbrella, so that I can do more in-the-round carving standing up. It makes it easier to move around the piece and I can use all my weight as leverage.
   I've been working on another doll and a big commissioned Santa staff that I will post pictures of soon. In between I have been making a bunch of little crosses for gifts.
   I have made crosses before of different sizes and I enjoy making them and thinking about how they might be used. It is important that they feel right when held. This is one of my latest design attempts using a spiraled, twisted pattern that looks pretty good on these crosses. They are about 2" tall x 1 1/2" wide. I cut them out on a bandsaw and then shape the twists with a carbide bit in a rotary shaft tool. I used a variety of different woods: lacewood, paduak, holly, ash, zebrawood, cocobolo, bocote, purpleheart, and walnut from my scrap box. Some of the wood was found in my neighborhood and others were gifts to me. Some from other places and other countries, and some from down the street. All different, but all the same. I thought the grouping made a neat picture.

Saturday, October 2, 2010

Barefoot Hitty Doll

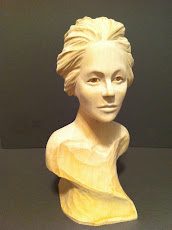
Here is a doll I started as my second project at War Eagle. Adina is known for her dolls and it was a chance for me to practice an additional female face. I had a lot of fun carving her, but she looks too real...it is strange takeing photos, so I had to buy her a dress! Thanks for looking!
http://picasaweb.google.com/mpounders1/Hitty#


Monday, September 20, 2010

"Girl from the North Country"

I just completed a week of "carving camp" and had a wonderful time! This was the project that I started and mostly finished in Adina Huckins' class at War Eagle. I have struggled like most with female faces and I jumped at the opportunity to learn from such an accomplished artist (http://www.adinahuckins.com/index.html ). I could not be more pleased with the results! I still need to a little more work before mounting to a base and applying a finish, but finished the hair and eyes last night and couldn't wait any longer. Adina is a wonderful teacher and I could not recommend her classes more strongly!


This about 10" tall from basswood and the title is from an old Bob Dylan song. My carving is based on a carving that Adina is doing of her neice. The title seemed appropriate for a young lady from Northwest Arkansas. Thanks for looking and comments and advice are always welcomed.
http://picasaweb.google.com/mpounders1/GirlFromTheNorthCountry#

Monday, September 6, 2010

Cheap Carving Knives.....make your own

One of the first things I learned about carving was that you have to have sharp tools. (this was closely followed by learning that you need a carving glove and a supply of bandaids). Many carvers struggle with sharpening their tools, so it is somewhat easier to start with a blade that is already sharp and then just stropping and honing it to keep it sharp. The Stanley utility knife might seem too ungainly for carving, but it is really a great knife. The blades are sharp and can be made sharper by stropping and they are cheap to replace if you nick the edge. The thin blade also slides through wood very easily. Although I use the Stanley extensively, the blade is too big or too wide or the wrong shape to do certain things or fit in certain places on a carving. So I made my own knives for about a $1 a piece. I purchased Excel blades (http://www.excelhobbyblades.com/index.php?cPath=46_82 ) at Hobby Lobby. They were already sharp, but I tired quickly of changing blades in their handles, so I made my own handles in various styles and shapes. Making your own handles allows you to experiment with shapes and sizes to find what you like. I am currently fond of the Mike Shipley style handles that are long and straight (they are surprisingly comfortable). Simple get a small square of wood and drill a 3/8" hole in the end about 1 1/2" deep. Cut a slot in the end of a 3/8" dowel and cut it off so that it fits in the hole. The tang of the blade fits perfectly in this size dowel! I use belt and drum sanders to shape the handle and then use epoxy to glue the dowel and blade into the hole. Very simple to make and the blades are already sharp and easy to keep sharp. The blades are about $1 each in a package of three, so if you don't like the handle or you want to reshape the blades, you are not out a lot of money. I have used the knives quite a bit over several years and they have held up well

Sunday, September 5, 2010

"Turkey Joe"

Here is another cowboy, inspired by Lynn's work and methods of work. The movie "Crossfire Trail" was recently on TV and I am a big fan of Louis Lamour books. Since I had already tried a Tom Selleck caricature, I decided to do one based on one of the sidekicks, played by Wilford Brimley. The character had a large mustache and a big feather in his hat. Not much of a resemblance to Wilford, but I like the way he turned out. I made the base out of cherry and I wanted to try one similar to the base Lynn used on his "Poncho" carving. I exaggerated the size of the kneckerchief and thought that it would be neat to have the knot and ends hanging down in the back. The hat turned out a little better than my first two, and I like the look of the turkey feather. Comments and advice are always appreciated! Thanks for looking.

http://picasaweb.google.com/mpounders1/TurkeyJoe#


Thursday, August 26, 2010

Router lift and heads in progress

I've spent the past few weeks building a router lift. Many years ago, I bought this Bosch plunge router. It has a big powerful motor, 1/2” collet, varible speed, and a soft start and I thought it was big improvement over my little craftsman router. Except it weighed a ton and when I mounted it in my router table, it was really a pain to adjust the height of the bit. I’m not sure that router lifts had been invented back then. But I ran across Matthias Wandel’s website and his wooden geared router lift http://woodgears.ca/router_lift/index.html . Since I had no money for a nice metal lift or room for a separate router table, I decided to redo the side table on my saw and try this one out. A few parts, some scrap wood, and a few days work and voila! It works really well, locks solidly in place, and allows me to use my existing fence and the miter slots on my saw. It raises the bits enough that it makes bit changes quite easy, actually easier than it was with the plunge rails on it. I still need to make my sacrifice fences to attach to my regular fence, but I am excited that this tool will be a lot more convenient than it originally was. I was really surprised at how fast it works.

Here's a few heads I've been working on, but haven't decided what they are going to be. I started them just carving for fun, so they may end up as scrap or they may work into something. I kinda like the bald guy and am thinking about a tall, bent top hat. Maybe he is a grave digger? The pointy ear guy may turn into a Christmas elf or a leprechaun. Kinda has a young Leonard Nimoy look to him? The guy with the hat was started as a sailor (planned on adding a pipe). Suggestions, ideas, and comments always welcome!


Tuesday, August 10, 2010

Award winning carver?

Technically, I guess I could call myself that since ........(drumroll),,,,,,,I got 5th place in the LumberJocks Summer Woodworking contest! I entered my snake staff in the contest which had the theme of "Fluidity".

Category


Fluidity – "Like grasses swaying in a summer breeze, the fluid motion is visible in the solid form of the wood." Create a woodworking project that portrays fluidity and/or movement, Be sure to describe your inspiration and vision - the interpretation is as important as the finished product.


The voting is by members rather than judged and I would have loved to win some of the higher prizes of gift certificates to different tool suppliers! There were 77 total entries and mine was picked fifth, which amazes me when you look at some of the beautiful entries that got fewer votes than mine. ( http://lumberjocks.com/awards/summer_2010/results/13 ) No money for me, but I get a cool mug and some work holders.

Sunday, August 8, 2010

"Still Running Against the Wind"

Here is a cane I just completed.I seem to be inspired by a lot of different songs lately. I have been wanting to carve a cane with a girls face and her hair as part of the handle for some time. One of the problems I have when carving on the end of a handle like this is that it is usually end grain. I prefer to have my grain running length-wise in the handle for strength and I like to add a spacer with the grain running vertically for the same reason. So I have been thinking about carving the face from a separate piece and inlaying it into the end. This is my first attempt, and I used basswood for the face and walnut for the handle and spacer. I turned the spacer a little thinner and taller than I normally do, trying for a feeling of delicacy. The handle and spacer are attached with epoxy and 1/4" threaded rod to the Bradford pear shaft with the bark on. I wood burned details for the hair using a pyrographic pen and finished with satin poly and a coat of wax. I still haven't carved a female face quite like I want it.....but practice makes perfect! Thanks for looking

http://picasaweb.google.com/mpounders1/StillRunningAgainstTheWind#

Friday, July 30, 2010

"Dashing through the Snow"

I carved quite a bit in my hotel room while I was in Dallas this month for training. I've been trying to finish up all the carvings that I started and had waiting for paint.

I have a friend who collects snowmen and she persuaded me to carve one last year, which my daughter confiscated. So I carved a different one for my friend. This is my first one this year and I am keeping my fingers crossed that I can at least post some pictures before they start grabbing at it! They are kinda fun to carve, but not as easy as I thought they would be. http://picasaweb.google.com/mpounders1/DashingThroughTheSnow#

I had the idea of a snowman flying down a hill on a sled, with his cap and coat flapping in the breeze. I wanted to try and give a sense of movement and motion with position of the body, the coat and the cap. I got to try a few new techniques (new to me) and also my first attempt at snow (on the base). I like the way it turned out. Still learning as I go.

I am also posting some Santa ornaments that I have been stocking up on. I have created a new "For Sale" gallery in my photo gallery that I hope will make it easier for people to see what I have available and how much I think you should pay me! We'll see if it works a little better. I am still waiting to hear on the contests I entered, but I suspect the only prize I may get is more experience! We'll see!
 As always, thanks for looking!

http://picasaweb.google.com/mpounders1/CarvingsForSale#

Wednesday, June 30, 2010

Snake on a stick!

I know it sounds like the latest deep-fried delicacy from the state fair, but maybe I'll come up with a better name. I just completed this staff/walking stick. It is about 60" tall from some twisted wood I got last Thanksgiving in Alabama. I think it really wanted to be a snake and I was inspired by the works of David Stehly in Pennsylvania to finally attempt one. I am pleased with how it turned out, although my wife and daughter can bearly stand to look at it! I plan to enter it in a couple of contests, maybe I'll get lucky. I should have some more pictures posted in my vimeo gallery later today, but here's some for now. Thanks mucho for looking! Here is the link to all the photos http://picasaweb.google.com/mpounders1/FluidByNature#


Thursday, June 17, 2010

"Walking in Memphis"

"....walking with my feet ten feet off of Beale" is how the song goes. I finished this carving a few days ago. It is inspired by the song and a small photo of a guitar player in a magazine ad. I've studied and tried to figure out how to capture the energy and passion you see in some musicians for about 6 months. I really struggled with the positioning and tried clay models and other things before finally just starting and working it out as I went along! I carved different areas out of separate pieces of wood for strength and to allow me to accurately position things exactly as I wanted it to look. The guitar has over 40 separate pieces. Thanks for looking! Click on the pictures at the side and zoom in to get a close look at the details!!!!
(More pictures here too http://picasaweb.google.com/mpounders1/WalkingInMemphis# )


Tuesday, June 8, 2010

Finishing up a carving

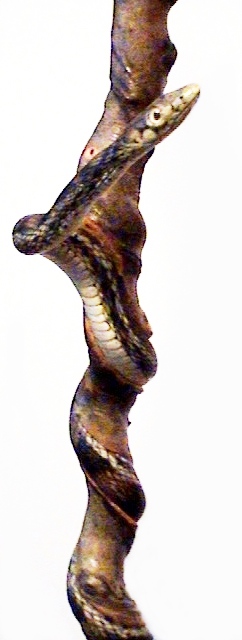
I've been working to complete a carving to enter in a contest and just finished it the past weekend. I may not post any pictures of it until after the 30th, but here is a "preview" to keep you interested! I have started a snake cane, in the David Stehly style (http://www.artsticks.com/ ), and I am continuing to work on ornaments and holiday stuff in between projects. I have registered for a week-long carving seminar in northwest Arkansas in Spetember, and will be taking a class from the renowned carver Adina Denton Huckins! I am really looking forward to this and hope to take my carvings to a higher level! I am also trying to practice for some other contests, but will be posting pictures of completed work within the next week of those things. Thanks for looking!

Saturday, May 15, 2010

Bark tree spirit and pumpkin ash cane

Here are a couple of carvings I finished this week. I also completed a shaft for a sword cane handle (for my neighbor).  I have been wanting to carve bark for a while but never got around to purchasing any. I found this cottonwood bark in downtown North Little Rock and got a few pieces to try. It is not as large or as thick as the cottonwood bark that you can get from other parts of the US. This is from the smallest piece, somewhat as an experiment, to see how it carved. I washed and wire-brushed the bark, and then cut off an area to reveal the inner reddish color. This stuff cuts very easily, but a sharp knife and care is needed to keep it from crumbling or flaking. Very fragile to carve, and difficult for me to detail, but it is so quick to carve! This is a tree spirit that took maybe 4 hours?


The handle on this cane is based on a tracing from the sword cane I repaired. It has a nice comfortable feel and I added a wood-burned Celtic knot. The wood is ash and the guy that gave it to me said it was "pumpkin" ash. He said it was used a lot in making guitars. I like the natural color and graining of it. The shaft is a skinny piec of Crape Myrtle. I have been making some slightly taller, skinnier canes. They are very light to carry.
Thanks for looking! (more pictures in link to my gallery at the left)

Thursday, May 6, 2010

The Illustrated Man

One of my favorite books when I was in high school was "The Illustrated Man", a collection of science-fiction short stories by Ray Bradbury. I loved the book, but the cover showed a bald tattooed man from the back, sitting in a lotus position. His tattoos would come to life at night, illustrating various stories and .... the future! So I have admired tatoos for sometime and even aquired one as a souvenir of my Navy career. I have been wanting to carve something like this for a while, inspired by the book, Maori tribal tattoos, and various woad designs. Not sure if he is a wizard or an old warrior, but he has a certain air about him (my wife says he is a little too realistic for her to look at very long). I did some turning on the spacer and the shaft is bamboo that has been heat-tempered. Thanks for looking!


Tuesday, April 27, 2010

Hickory Floral & Leaf Cane finally finished

Finally finished it after putting it aside for a month. It is based on the patterns and design styles I used to use in leatherwork, like saddles and holsters and such. The handle is actually the root-ball of the sapling that I harvested at my Mom's place back in Alabama. It has a neat burled look to it ans I tried to keep a lot of the original shape. It has finger gooves and such carved specifically to fit the hand. I was trying for kind of a melted wax look for the handle that is repeated in the natural shapes and the carved stems at the bottom of the cane. I used gouges, knives, and my flex shaft to relief carve (?) the patterns to make them stand out from the shaft. Then I broke out my wood burner and shaded, scribbled, and cross-hatched it to add depth and details. I finiished with some light painting with thinned burnt umber acrylic to complement the wood burning and try and add to the leather/leaf look. I'm kinda glad to be through! More pictures here:
http://picasaweb.google.com/mpounders1/10_04_27_00#

Sunday, April 11, 2010

another Wrinkled Santa

Here is a wrinkled Santa I finished using some of the techniques I use for carving caricatures. The hat is made in three pieces and fitted and glued together to look like one piece. This method gives more strength to the carving and allows more flexibility in posistioning the hat to get just the right look. Thanks for looking. (More pictures at http://picasaweb.google.com/mpounders1/WrinkledSanta# ).