Monday, September 20, 2010

"Girl from the North Country"

I just completed a week of "carving camp" and had a wonderful time! This was the project that I started and mostly finished in Adina Huckins' class at War Eagle. I have struggled like most with female faces and I jumped at the opportunity to learn from such an accomplished artist (http://www.adinahuckins.com/index.html ). I could not be more pleased with the results! I still need to a little more work before mounting to a base and applying a finish, but finished the hair and eyes last night and couldn't wait any longer. Adina is a wonderful teacher and I could not recommend her classes more strongly!


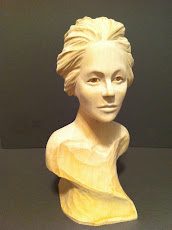
This about 10" tall from basswood and the title is from an old Bob Dylan song. My carving is based on a carving that Adina is doing of her neice. The title seemed appropriate for a young lady from Northwest Arkansas. Thanks for looking and comments and advice are always welcomed.
http://picasaweb.google.com/mpounders1/GirlFromTheNorthCountry#

Monday, September 6, 2010

Cheap Carving Knives.....make your own

One of the first things I learned about carving was that you have to have sharp tools. (this was closely followed by learning that you need a carving glove and a supply of bandaids). Many carvers struggle with sharpening their tools, so it is somewhat easier to start with a blade that is already sharp and then just stropping and honing it to keep it sharp. The Stanley utility knife might seem too ungainly for carving, but it is really a great knife. The blades are sharp and can be made sharper by stropping and they are cheap to replace if you nick the edge. The thin blade also slides through wood very easily. Although I use the Stanley extensively, the blade is too big or too wide or the wrong shape to do certain things or fit in certain places on a carving. So I made my own knives for about a $1 a piece. I purchased Excel blades (http://www.excelhobbyblades.com/index.php?cPath=46_82 ) at Hobby Lobby. They were already sharp, but I tired quickly of changing blades in their handles, so I made my own handles in various styles and shapes. Making your own handles allows you to experiment with shapes and sizes to find what you like. I am currently fond of the Mike Shipley style handles that are long and straight (they are surprisingly comfortable). Simple get a small square of wood and drill a 3/8" hole in the end about 1 1/2" deep. Cut a slot in the end of a 3/8" dowel and cut it off so that it fits in the hole. The tang of the blade fits perfectly in this size dowel! I use belt and drum sanders to shape the handle and then use epoxy to glue the dowel and blade into the hole. Very simple to make and the blades are already sharp and easy to keep sharp. The blades are about $1 each in a package of three, so if you don't like the handle or you want to reshape the blades, you are not out a lot of money. I have used the knives quite a bit over several years and they have held up well

Sunday, September 5, 2010

"Turkey Joe"

Here is another cowboy, inspired by Lynn's work and methods of work. The movie "Crossfire Trail" was recently on TV and I am a big fan of Louis Lamour books. Since I had already tried a Tom Selleck caricature, I decided to do one based on one of the sidekicks, played by Wilford Brimley. The character had a large mustache and a big feather in his hat. Not much of a resemblance to Wilford, but I like the way he turned out. I made the base out of cherry and I wanted to try one similar to the base Lynn used on his "Poncho" carving. I exaggerated the size of the kneckerchief and thought that it would be neat to have the knot and ends hanging down in the back. The hat turned out a little better than my first two, and I like the look of the turkey feather. Comments and advice are always appreciated! Thanks for looking.

http://picasaweb.google.com/mpounders1/TurkeyJoe#